
Install website tracking
Add one Jelto script to your site's shared HTML. It collects pageviews and supported automatic interactions; custom goals are configured separately.
Before you start
Choose Add website, enter your website address, and check its name and reporting timezone. Creating the website registers that hostname and opens a three-step setup: Add website → Install tracking → Connect revenue (optional). Have permission to edit and publish your website.
If your website also has a macOS, Windows or Linux app, enable This website also has an app. This adds an optional Set up SDK step after website tracking. Your choice is remembered for this product in your browser; products with a registered app include that step automatically. You can also enable it from the installation step later.
You can choose Finish later and return through Finish setup in the product list. Existing websites can also use Settings → Installation, where you can add more allowed hostnames and change tracking preferences.
Install the script
Set up with AI
In the Install tracking step, Set up with AI is selected for you. Check the target hostname and optionally choose your framework; Let my assistant detect lets your coding assistant inspect the repository. Choose Copy prompt, then paste it into Cursor, Claude Code, Codex or another coding assistant with your project open.
The English prompt includes your public product ID, saved tracking preferences, complete script, framework guidance and verification checklist. Save preference changes before copying an updated prompt. View prompt shows the full text; if automatic copying fails, select and copy that text manually.
Review the changes and publish through your normal workflow, then choose Check my installation and follow Check your installation. Copying a prompt or passing a build does not confirm that Jelto has received traffic.
Install manually
- Open the Install tracking step, or Settings → Installation.
- Choose Install manually, select your platform for matching instructions, then choose Copy code.
- Paste the complete tag inside the shared
<head>of your site, or into your platform's site-wide custom-code field. Use the platform guides for the exact location. - Save and publish the website. A change in an editor preview is not necessarily live.
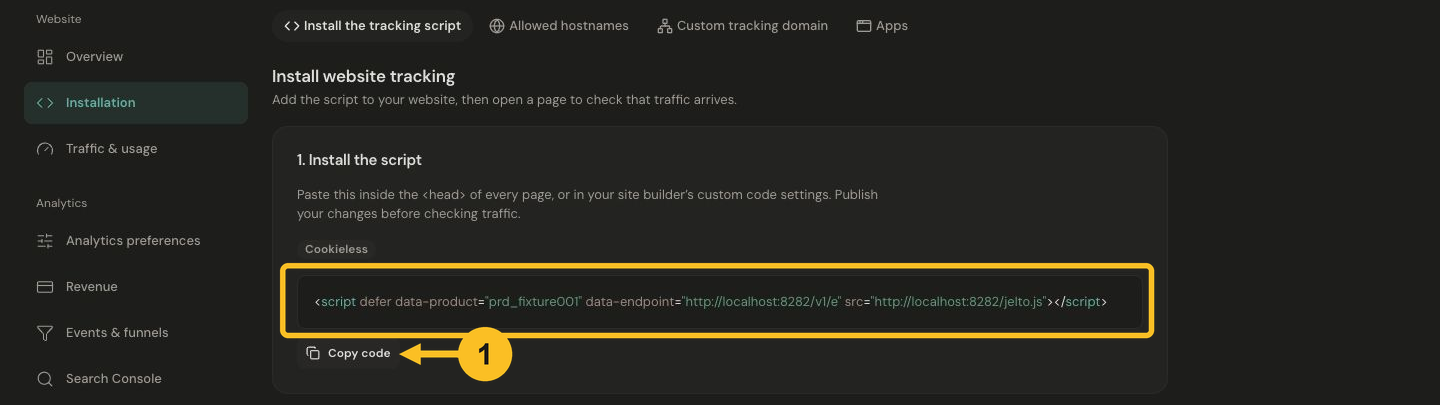
Copy the script for this product, paste it into your website, and publish your changes.
Your copied tag has this shape. All three uppercase values below are placeholders; copy their actual values from your dashboard.
<script defer
  data-product="YOUR_PRODUCT_ID"
  data-endpoint="YOUR_INGEST_ENDPOINT"
  src="YOUR_SCRIPT_URL"></script>
The product ID is a public collection identifier. A secret jk_ API key never belongs in this tag. Keep data-endpoint when your copied tag includes it, especially with a custom tracking domain.
Verify
Open the published website in a normal browser tab, visit a page, then follow Check your installation. Install the script once per HTML document; Jelto handles supported SPA history changes itself.
The first-visit check within Install tracking updates automatically and shows the latest received pageview for the selected hostname. Once connected, choose View dashboard or Continue to revenue. You can also continue while traffic is still waiting; the installation is only marked connected after Jelto receives a pageview.
Set up an app SDK (optional)
In Set up SDK, enter your app's name and platform, then choose Add app. Its SDK instructions open after registration. Choose your SDK and use Copy prompt with a coding agent, or switch to Install manually. See Connect a desktop app for SDK availability and verification.
Choose Continue to revenue when you're ready, or Skip for now to leave SDK setup for later. Skipping does not register an app or mark its SDK as installed.
Connect revenue (optional)
Choose Stripe, Lemon Squeezy or Polar and follow the provider guide to create a key. Review the account and product scope before connecting, then follow Set up checkout to link payments to traffic. Payment history and checkout attribution are verified separately.
For Paddle or another provider, choose Other / Payments API for the server integration guide. Choose Skip for now to open your dashboard without connecting a provider; you can return through Settings → Revenue anytime. See Connect revenue for details.
Common problems
If only the homepage appears, move the tag to the shared layout. If nothing arrives, check the hostname, content security policy, blocker extensions and missing-data guide. If counts look doubled, check for duplicate installations.
For optional behavior, use Script configuration.